How to fix leaking dishwasher water supply line?
Have you ever experienced water pooling around your dishwasher? If so, you might have a leaking water supply line. This can not only cause damage to your kitchen, but also result in high water bills. So, what can you do to fix it?
A leaking dishwasher water supply line is a common problem faced by many homeowners. It can be caused by various factors such as wear and tear, loose connections, or even improper installation. Ignoring this issue can lead to severe water damage and expensive repairs.
Luckily, fixing a leaking dishwasher water supply line is a relatively simple task that can be done by anyone with basic plumbing knowledge. In this article, we will guide you through the steps to fix this issue and help you save both time and money. Read on to learn how to fix a leaking dishwasher water supply line.
What Causes a Leaking Dishwasher Water Supply Line?
A leaking dishwasher water supply line can cause a lot of trouble in the kitchen. Not only does it waste water, which can cause damage to your kitchen floor and cabinetry, but it can also result in costly repairs if left unchecked. It’s essential to identify the cause of the leak and fix it as soon as possible.

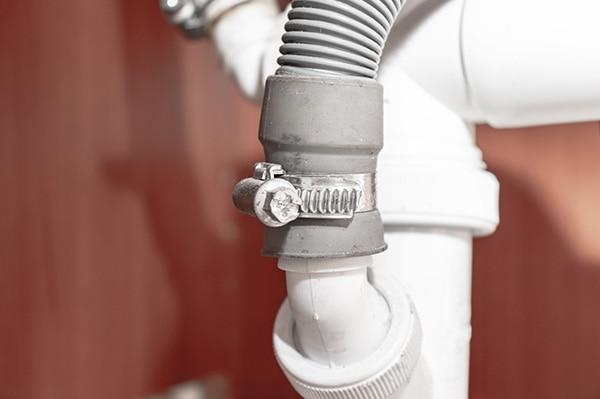
One of the most common culprits of a leaking dishwasher water supply line is a loose connection. Over time, the hose clamps that secure the water supply line to the dishwasher or the household plumbing may become loose, causing water to seep out. It’s essential to check these clamps regularly and ensure they are tightened.
Another common cause of a dishwasher leak is a defective inlet valve. If the valve is faulty, it may not be capable of properly regulating the flow of water into the dishwasher, causing it to leak. In some cases, the valve may need to be replaced entirely to fix the issue.
A faulty gasket can also result in a dishwasher water supply line leak. The rubber gasket that seals the water inlet hose to the dishwasher can become damaged over time, causing water to seep through the opening. Replacing the gasket is a relatively simple fix and should resolve the leaking issue.
Water pressure can also cause a dishwasher water supply line to leak. If the water pressure is too high, it can damage the rubber hoses, causing them to weaken and eventually leak. Installing a water pressure regulator can help alleviate this problem.
Preparing to Fix Your Leaking Dishwasher Water Supply Line
Few things are more frustrating than a leaking dishwasher water supply line. Not only can it lead to water damage in your kitchen, but it also disrupts your dishwashing routine. Fortunately, fixing the issue is often a relatively simple matter.
Before you begin, it’s important to gather your tools and understand what’s causing the leak. Here are a few steps to ensure a successful repair:
Step 1: Turn off the Power and Water Supply
Before attempting to access your dishwasher’s water supply line, be sure to turn off both the power and water supply. This will help prevent any accidents or further damage to your dishwasher or home.
Step 2: Locate the Leak
The first step in fixing your dishwasher’s water supply line is to locate the source of the leak. If it’s a loose connection or faulty gasket, these can typically be found near the connection point between your dishwasher and the household plumbing. Look for any visible signs of water pooling or dripping to identify the location of the leak.
Step 3: Obtain Replacement Parts
If the issue is a faulty inlet valve or gasket, you may need to replace these parts. Be sure to double-check your dishwasher’s model number and purchase the correct replacement parts from your local hardware store.
Step 4: Prepare Your Work Area
Before beginning any repairs, it’s essential to have a clean and safe work area. Remove any dishes or debris from your dishwasher and clear the area around the water supply line. It may also be helpful to place a towel or container underneath the leak to catch any excess water.
Step 5: Follow the Manufacturers Instructions
Different dishwasher models may require different methods of access, so it’s important to consult your dishwasher’s user manual for specific instructions. In general, you’ll likely need to remove the access panel to the back of your dishwasher to reach the water supply line.
Inspecting the Float Switch and Drain Hose for Damage
When dealing with a leaking dishwasher, it’s crucial to explore all possible sources of the leak. Two components that often cause leaks are the float switch and drain hose. Here’s how to inspect these parts for damage:
1. The Float Switch
The float switch is responsible for controlling the flow of water into the dishwasher. It’s a small component located in the tub of the dishwasher. First, remove all items from the dishwasher and ensure that there is no standing water in the tub.
Depending on your dishwasher model, the float switch may be located either in the front or back of the dishwasher tub. To access the switch, remove the bottom dish rack and any other obstructions. Take a close look at the float switch for any signs of damage or wear. Ensure that it moves up and down freely without any obstruction. If the float switch is damaged, it may need to be replaced.
2. The Drain Hose
The drain hose is responsible for carrying water out of the dishwasher. However, if the drain hose becomes damaged or clogged, it can cause water to back up into the dishwasher and lead to leaks. To inspect the drain hose, start by turning off the power and water supply to your dishwasher.
Locate the drain hose at the rear of the dishwasher and disconnect it from the garbage disposer or sink drain. Check the hose for any damage, such as tears or cracks. Inspect both ends of the hose for clogs or debris. If there are any issues with the drain hose, it should be replaced.
Replacing Parts of Your Dishwasher’s Water Supply System as Needed
As a homeowner, dealing with a leaking dishwasher can be a real headache. Not only can it cause damage to your floors and cabinets, but it can also be a safety hazard for you and your family. Fortunately, if your dishwasher has a water supply system that requires repair, there are some easy steps you can take to fix the problem.
One of the first things you’ll want to check is the rubber gasket on the water inlet valve. If this gasket becomes worn or damaged, it can cause water to leak from the valve and seep out of the dishwasher. To replace the gasket, start by locating the water inlet valve. You may need to remove the access panel on the front of the dishwasher to access it. Once you’ve located the valve, simply remove the old gasket and replace it with a new one. This should create a watertight seal and prevent any further leaks.
Another potential culprit of dishwasher leaks is the water inlet hose. Over time, this hose can become loose or develop cracks, leading to water pooling around the base of the dishwasher. Check the hose for any signs of damage and make sure it is securely connected to both the dishwasher and the water supply valve. If you find that the hose is damaged, it should be replaced with a new one.
In some cases, it may be necessary to replace the dishwasher’s water inlet valve entirely. If this is the case, it’s important to turn off the power and water supply to the dishwasher before attempting any repairs. Once you’ve disconnected the old water inlet valve, simply connect the new one in its place. Be sure to follow the manufacturer’s instructions carefully to ensure that the new valve is properly installed.
Finally, if you’ve checked and replaced all other components of the water supply system and you’re still experiencing leaks, it may be time to call in a professional. A licensed plumber or appliance repair specialist may be able to diagnose and fix the problem for you. They can also help you identify and repair any other issues that may be contributing to the leak, such as loose connections, faulty gaskets, or mineral deposits.
Reassembling Your Dishwasher After Repair Work is Complete
After spending time diagnosing and repairing your dishwasher, it’s important to make sure that you properly reassemble it to avoid any further issues or leaks. In this article, we will go over the necessary steps to reassemble your dishwasher after completing repair work.

1. Reconnect the water supply line – If you had to disconnect the water supply line during repairs, it’s important to reconnect it before moving forward. Ensure that the line is securely fastened to both the dishwasher and the water supply valve to prevent leaks.
2. Reattach the drain hose – The drain hose also needs to be reattached to allow for proper drainage during the dishwasher cycle. Make sure the hose is securely fastened and any clamps are tightened to prevent any leaks.
3. Restore any electrical connections – If any electrical connections were disconnected, reattach them and ensure they are secure. Make sure all wires are properly connected and any protective coverings are replaced.
4. Replace any panels or covers – Once all connections have been restored and checked, replace any access panels or protective covers that were removed during the repair process.
5. Test the dishwasher – Before using your dishwasher, it’s important to test it to make sure everything is working as it should. Run a wash cycle with no dishes and check for any leaks or unusual noises.
Meet Lila Robinson, an expert in the world of plumbing with a talent for delivering valuable insights and captivating articles on an array of plumbing topics. With years of experience handling complicated plumbing issues, Lila has become a go-to resource for homeowners and businesses alike.
Packing vast knowledge in plumbing tools and science, Lila creates a sense of community on her blog and social media accounts, engaging with readers from all walks of life. Her writing style is authentic, unique, and engaging, and she has an exceptional ability to break complex concepts into understandable ideas.
If you have encountered a plumbing issue, chances are Lila Robinson has conquered it. Her articles uncover the underlying problems behind some of the most unexpected plumbing problems, from tankless water heater error codes to drain snakes in vents.
Whether you’re a beginner or an experienced plumber, Lila Robinson’s blog has something for you. Follow her social media accounts to keep up-to-date with the latest posts and join the conversation.